Docker WiFi Router & Firewall
In this guide SPR will be setup to manage the host's network, firewall, wired ports, and wireless interfaces.
SPR runs with Docker services running prebuilt containers or containers built locally from source.
We recommend working with upstream docker for full docker compose and buildkit support
Base System Setup
NOTE This guide shows how to setup and run SPR using Docker. See the Raspberry Pi 4 Setup Guide for running SPR using a prebuilt image.
Download and install Ubuntu Server
Skip this step if you already have a base system setup.
For Running on a Raspberry Pi you can download the 24.04 Ubuntu image here. For other hardware, download an Ubuntu server installer for your architecture (arm64 or amd64), then boot the device into the installer.
SPR has been tested mainly with Ubuntu however many Linux distributions should work. Upstream docker is recommended for the buildkit features.
Write image to SD-card or USB
You can flash the image with a tool such as the Official Raspberry Pi Imager -- https://www.raspberrypi.com/software/. Be sure to select 'Other OS'
If you prefer to write the image using the command line:
# On a mac, write the image to the external disk (rdiskX).
# Be careful to make sure you identify your removable drive correctly.
$ xzcat ubuntu-24.0-4-preinstalled-server-arm64+raspi.img.xz | dd of=/dev/rdiskX bs=$[1024*1024]
Setup
Boot the system and login, the default credentials are ubuntu/ubuntu
Fetch the SPR repository
# On the booted system
git clone https://github.com/spr-networks/super
cd super
Prepare the Ubuntu Install for SPR base/setup.sh
#if using a flash drive
sudo base/setup.sh
#or if using an sdcard the following script reduces disk usage
# base/setup-sdcard.sh #this setup will reduce writes from log files
reboot
Configuration
Inside the super directory, copy base/template_configs/ to configs/
cd super
cp -R base/template_configs configs
./configs/scripts/gen_coredhcp_yaml.sh > configs/dhcp/coredhcp.yml
./configs/scripts/gen_watchdog.sh  > configs/watchdog/watchdog.conf
Verify the main config configs/base/config.sh is correct. Ensure that WANIF matches the name of the outbound interface if not using the builtin ethernet port.
Also, consider disabling UPSTREAM_SERVICES_ENABLE=1 if you do not want the API and SSH exposed to the WAN port.
Run SPR
Start the services :
docker compose up -d
Testing containers are built and published to GitHub's Container Registry, and can be run without building on the device. If you would instead like to build everything from source, proceed to the next section.
To see logs:
docker compose logs -f
Run SPR dev release
If you want to get the latest features and updates you can switch to the dev release of SPR by setting the RELEASE_VERSION and RELEASE_CHANNEL environment variables:
export RELEASE_VERSION="latest" RELEASE_CHANNEL="-dev"
docker compose up -d
Setting the RELEASE_VERSION variable can also be used to run specific versions:
export RELEASE_VERSION="v0.1.28"
docker compose up -d
Building the project
SPR can be built and deployed with containers or even be built on device.
For also developing on-device, systems should have 32-64GB of writable storage and 8GB of RAM. With less RAM, building from ram disks should be disabled (see the README).
Network setup:
Because SPR uses nftables exclusively, and docker is made to work with iptables
which the SPR install disables for docker, a fixup script is needed for docker containers to have access.
The script installs minimal docker forwarding rules. Once SPR is running this is no longer needed. However, is SPR fails to run and you need to build with docker, you may need to run this script again.
#fix forwarding rules for Docker
sudo ./base/docker_nftables_setup.sh
And build.
sudo ./build_docker_compose.sh --load
If something went wrong with with a cached stage, it is possible to specify --no-cache.
For example: sudo ./build_docker_compose.sh --no-cache --load
A specific service can also be built by passing it as an argument (./build_docker_compose.sh api --load)
To run the local build:
docker compose up -d
Additional Notes
Check dns-Corefile to tweak DNS server configuration as well as the hostapd settings in configs/dns/. Some of these settings are now available in the UI as well.
It is possible to use SPR's DNS server for the host system's DNS requests too, by updating the resolv.conf file.
sudo echo -e "nameserver 127.0.0.1" > /etc/resolv.conf
Command-Line Setup (TUI)
If you prefer to configure SPR from the terminal — for example on a headless install — SPR ships with an nmtui-style text user interface. SSH into the device and run the setup script:
ssh [email protected]
sudo /home/spr/super/base/scripts/spr-setup-tui.sh
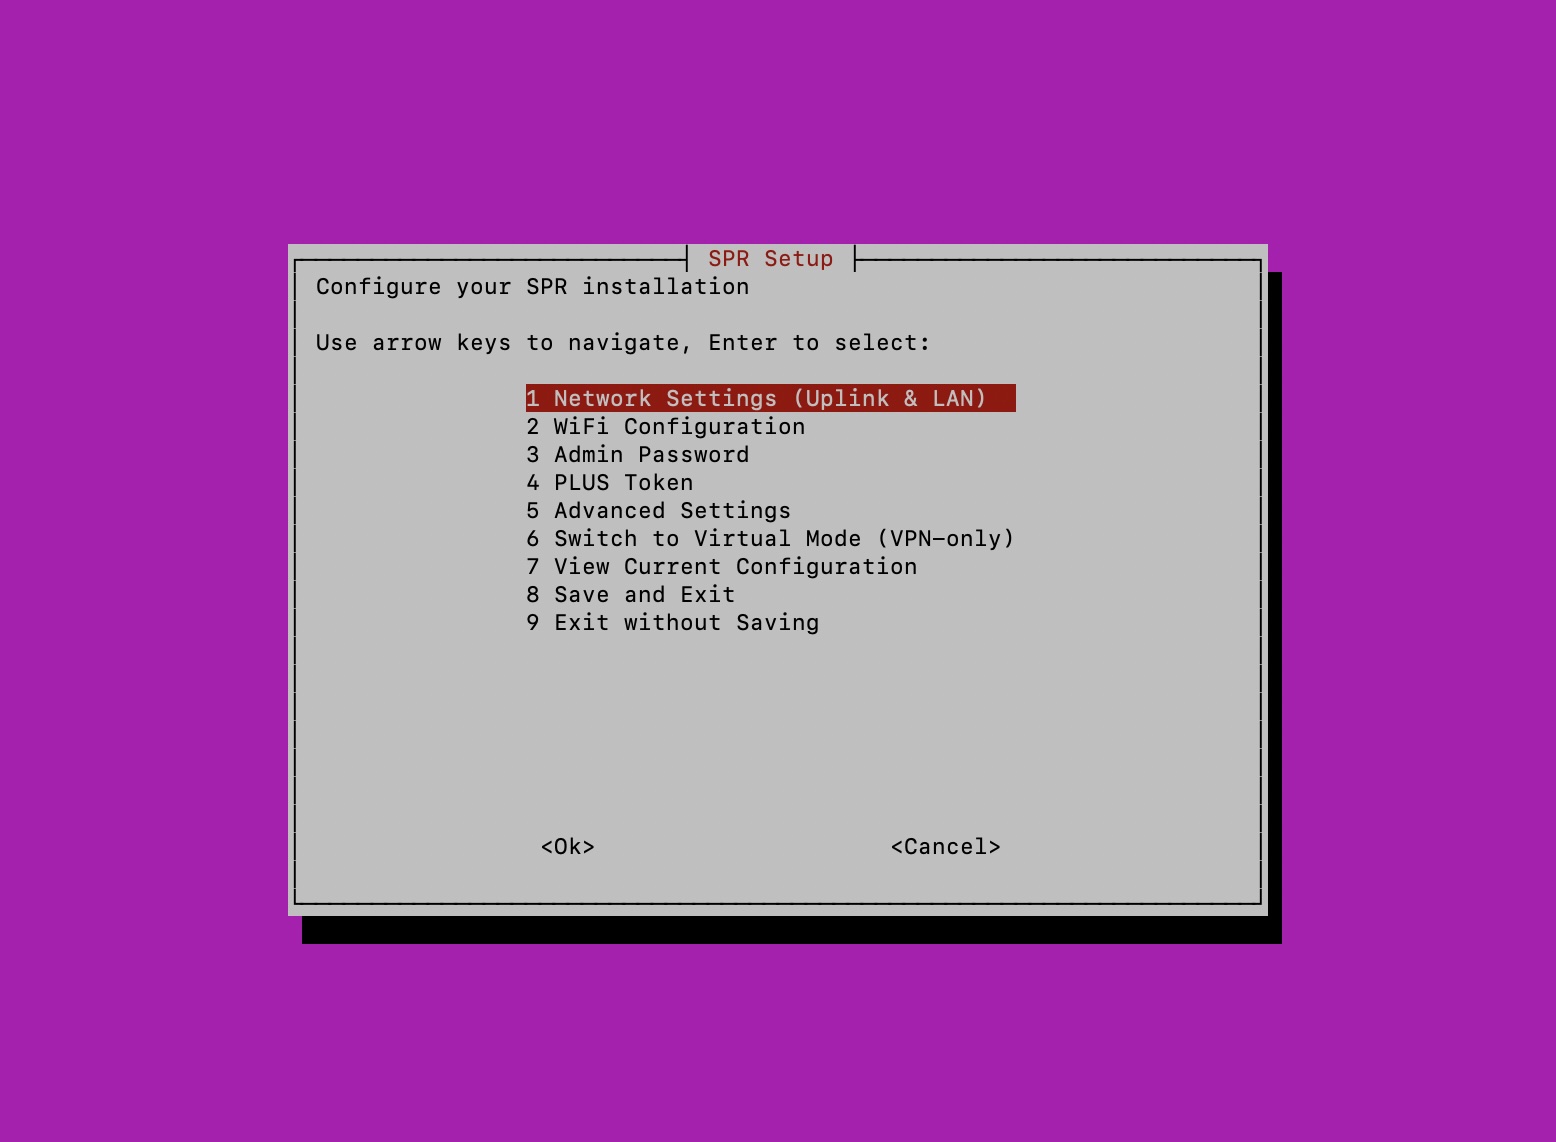
The TUI walks you through network interfaces, WiFi configuration, the admin password, the PLUS token, and advanced options including Virtual SPR (VPN-only) mode. Use the arrow keys to navigate, Enter to select, and Tab to move between buttons. Choose Save and Exit when you're done.
Sign in to the Web UI
You can follow along with the Install Guide
Connect to the IP of the device from the wired WAN interface in a browser, SPR is using mDNS and you should be able to reach it @ http://spr.local. If that does not work, check http://192.168.2.1 which is the default subnet SPR installs with.
A setup screen should show up asking you to set up interfaces and assign a username and password.