· 3 min read

Introduction

This guide shows how to setup a new E2 instance in Google Cloud, allow VPN access in firewall and install Virtual SPR. The result is a private VPN with a custom DNS server able to block ads, log traffic, and more features included in SPR.

For a more general and in-depth guide see the Virtual SPR Guide.

Setup Account

Skip this section if you already have an Google Cloud account & a project setup.

Go to Google Cloud & sign in with a Google account, or create a new one and enable Google Cloud. Google have a Free Tier where you get $300 in free credits when signing up as a new customer. Continue by creating a Payment Profile.

When done click New Project in the top menu dropdown and pick a name for your project.

Create Instance

In the top navigation menu go to Compute Engine and click VM Instances.

Click Enable if you haven't used the service before. If promped to create a project, pick a name for it & click Create.

Click Create Instance.

Select a name for your instance & pick a region.

For Series go with E2 and Machine type for the least expensive alternative.

Under Boot disk click Change:

Select and save:

  • Operating System Ubuntu
  • Version Ubuntu 22.04 LTS x86/64

Expand Advanced options, then Networking, scroll down to Network interfaces and click default. Select External IPv4 address and click Create IP address to assign a static IP address for your instance.

The default settings is fine for the other options. Now click Create to boot up the instance.

Firewall rules for VPN access

In the navigation go to VPC Network and click Firewall. Click Create Firewall Rule at the top of the page.

Settings in screenshot:

  • Name allow-wireguard
  • Diretion of Traffic ingress
  • Network default
  • Targets All instances in the network all is fine, specify a target if you run more instances
  • Source Filter IP ranges
  • Source IP Ranges 0.0.0.0/0 or if you know the range you will be connecting from
  • Protocols and Ports UDP and 51280
  • Second Source filter None

Note: This only allows connections to the instance, WireGuard will authorize clients when connecting.

Access instance & install SPR

Your instance should be available under Compute Engine -> VM Instances. Click SSH in the listing:

A browser window should popup with a terminal. Run the SPR virtual installer with sudo:

sudo bash -c "$(curl -fsSL https://raw.github.com/spr-networks/super/master/virtual_install.sh)"

Check out the source for virtual_install.sh here.

If you want to add another device, just run the setup script again:

cd super
sudo ./virtual_install.sh

Now you have a WireGuard VPN config ready, either scan the QR Code or paste the config into the WireGuard client.

For more information on setting up the client see the Virtual SPR Guide on how to connect your VPN client to the instance.

· 3 min read

Introduction

This guide shows how to setup Virtual SPR on a Micro Tier Instance on AWS, and connect to it using WireGuard VPN.

The result is a private VPN with a custom DNS server able to block ads, log traffic, and more features included in SPR.

For a more general and in-depth guide see the Virtual SPR Guide.

Create a Instance

Sign in to AWS Console and navigate to Instances in the menu. Click Launch Instances for your selected region.

Name your instance and select Ubuntu and 64-bit (x86) as architecture under OS Images.

For instance type choose any micro tier eligible for free, t2.micro is used in the example.

If you already have a keypair that you want to use, select it under Key pair or click Create new key pair, save the .pem-file to your ~/.ssh directory and make sure only your user can read it.

Allow VPN access

Under Network settings click Edit and scroll down to Add security group rule. Select UDP & port 5128, "vpn" as description and if you want to allow access from a specific source ip or range.

Click Launch Instance in the bottom right.

Install Virtual SPR

Navigate to Instances, the newly created instance should be available in the listing and shown as Running, click it. Copy the value under Public IPv4 address and ssh into the box as the ubuntu user:

ssh -i ~/.ssh/awsspr.pem ubuntu@paste-ipv4-address-here

NOTE You can also use the Instance Connect-feature if you don't have access to a ssh client. Click Connect under the Instance Summary to get access to a terminal.

Run the SPR virtual installer with sudo:

sudo bash -c "$(curl -fsSL https://raw.github.com/spr-networks/super/master/virtual_install.sh)"

NOTE: If the script cannot get the public ip address of the instance from one of the network interfaces, it will ask to fetch this from https://ifconfig.me. Answer yes to fetch this or edit this later (Endpoint in the WireGuard config).

The script will download the SPR repository and run virtual_install.sh (you can also checkout the repository and run the script manually if you want to inspect the script before running it.)

If you want to add another device, just run the setup script again:

cd super
sudo ./virtual_install.sh

Now you have a WireGuard VPN config ready, either scan the QR Code or paste the config into the WireGuard client.

For more information on setting up the client see the Virtual SPR Guide on how to connect your VPN client to the instance.

· 2 min read

Introduction

This guide shows how to setup Virtual SPR on a DigitalOcean Droplet and connect to it using WireGuard VPN.

For a more general and in-depth guide see the Virtual SPR Guide.

Create a Droplet

Login to DigitalOcean and click Create Droplet.

Select prefered Region and Datacenter (Amsterdam and AMS3 in the example), go with default Ubuntu 22.04 x64 for OS and version.

For Droplet Size, the smallest $4/month Basic with 512 MB RAM is enough but feel free to choose another one.

If you already have a ssh key configured for a project you can choose the pubkey or click New SSH Key for Choose Authentication Method.

Click Create Droplet & wait for it to spin up.

Install Virtual SPR

When the droplet has started, copy the ipv4 address and ssh into the box using your ssh key as root:

ssh -i .ssh/id_rsa root@paste-ipv4-address-here

Run the SPR virtual installer as root on the droplet:

bash -c "$(curl -fsSL https://raw.github.com/spr-networks/super/master/virtual_install.sh)"

The script will download the SPR repository and run virtual_install.sh (you can also checkout the repository and run the script manually if you want to inspect the script before running it.)

If you want to add another device, just run the setup script again:

cd super
./virtual_install.sh

Now you have a WireGuard VPN config ready, either scan the QR Code or paste the config into the WireGuard client.

For more information on setting up the client see the Virtual SPR Guide on how to connect your VPN client to the droplet instance.

· 4 min read

Introduction

This guide will show how to setup virtual SPR and connect to it using a WireGuard VPN client from your phone or desktop computer.

The result is a private VPN with a custom DNS server able to block ads, log traffic, and more.

Quick install

sudo bash -c "$(curl -fsSL https://raw.github.com/spr-networks/super/master/virtual_install.sh)"

Open WireGuard & scan the QR Code/import config - Done!

Virtual SPR Install

What you need

  • A linux server running Ubuntu 22.04
  • If there is a firewall port 51280/udp needs to be open for incoming traffic
  • WireGuard (© Jason A. Donenfeld) installed on your client phone or desktop

Run Virtual Installer

sudo bash -c "$(curl -fsSL https://raw.github.com/spr-networks/super/master/virtual_install.sh)"

What the script does

  • downloads the latest SPR repository from https://github.com/spr-networks/super/
  • downloads prebuilt docker images
  • generate default configs
  • setup admin password and auth token for API access
  • start SPR
  • add a VPN peer and output the WireGuard config

You can also download the script if you want to check it out or add blocklists for ads:

curl -s -O https://raw.githubusercontent.com/spr-networks/super/main/virtual_install.sh
chmod +x virtual_install.sh
sudo DNS_BLOCK=hosts,ads,tracking,redirects ./virtual_install.sh

See here for available blocklists.

Example to block DNS requests to adservers and social media:

sudo DNS_BLOCK=ads,tracking,facebook,tiktok ./virtual_install.sh

If you want to change the admin password you can edit the file configs/base/auth_users.json

Running the script you should see login info, a QR Code & the WireGuard client config. Example:

...
[+] WireGuard config: (save this as wg.conf & import in client)
----------------------------------------------------------

[Interface]
PrivateKey = privkey
Address = 192.168.2.94
DNS = 192.168.2.1

[Peer]
PublicKey = pubkey
AllowedIPs = 0.0.0.0/0, ::/0
Endpoint = 198.211.120.224:51280
PersistentKeepalive = 25
PresharedKey = psk

If you want to connect to the VPN using a desktop client, save the config as wg.conf on your local computer.

Configure the VPN client on your device

For iOS and Android

Scan the QR Code in the official WireGuard App (iOS, Android) to import your VPN profile.

Linux, macOS and Windows

Click "Add empty tunnel..." paste the config and set a name for the tunnel. Or, if you saved the config to a file:

  • Open your WireGuard client and click "Import tunnel(s) from file"
  • Select the wg.conf file
  • Click Activate

Admin interface

Make sure you're connected to the VPN endpoint & browse to http://192.168.2.1 to access the admin interface.

Login using the credentials shown in the output from the script or if you set the password manually (NOTE you can check the login info by running SKIP_VPN=1 ./virtual_install.sh).

If you prefer to use curl:

$ export TOKEN="BASE64-TOKEN-FROM-OUTPUT"
$ curl -s -H "Authorization: Bearer $TOKEN" 192.168.2.1/devices

Checkout the documentation to get started using the SPR API.

Modify Blocklists

In the admin interface you can enable more blocklists by clicking Blocklists/Ad-block under DNS:

SPR comes bundled with the hosts file from https://github.com/StevenBlack/hosts and the blocklists from the https://github.com/blocklistproject/Lists repository, including: redirect, ads, facebook, twitter, malware, porn, redirect, tracking, youtube, everything

If something is missing you can always add custom blocklists or block specific domains.

View traffic

Navigate to DNS Log in the DNS category, select the client to get a log of domains:

Here you can also add more blocks, domain overrides if you want to allow something temporarily, delete logs or disable them completely under Settings.

It is also possible to get more detail traffic for connections under Traffic:

Outro and random notes

You can remove lan from your device groups for a device but its needed to access the admin interface.

SPR is configured to use DNS over HTTPs when resolving domains. You can modify the Coredns configuration under configs/dns/Corefile

· 4 min read

Building a Home WiFi Network

Putting together a home network has several subtly annoying security tradeoffs.

Users want

  • Ease of Use & Connectivity

    Maximized by keeping devices maximally connected with a simple passphrase

  • Privacy and Security

    Maximized by keeping devices minimally connected. And ideally offline 🦦

If the goal is a bit of both, how to do segmentation correctly quickly becomes a bit of a puzzle

What's the Best Way to Chain Your Routers?

The "Secure Router" can be considered the Work From Home access point, and the "Guest Router" can be considered the Guest, Personal, or IOT access point.

The Worst Choice

Option #3 is to connect the internet to the secure router, and then plug the guest router into the secure router. Guests and untrustworthy devices can connect to the guest router.

This might make sense intuitively for some. You put the Secure Router close to the internet since that's where all the internet traffic will go out from, and if the Guest Router is compromised, it can't intercept traffic.

However, since the Guest Router is a Peer on the Secure Router network's LAN, every "Guest" station and the router will be able to reach the secure router and devices on the secure network LAN.

Unless either the Guest Router can block requests to the Secure LAN with its firewall, or the Secure Router can isolate the port for the Guest Router for only internet access, this is not an accepted best practice.

Split ESSIDs

Option #1 is to share a router for both SSIDs, with one ESSID and password for the Secure LAN and one for the Guest LAN.

The expectation is that devices can not send packets across the two LANs.

The great tradeoff with this is that if a user wants to control their IOT devices they have to switch to the guest network. And if device isolation is enabled on the guest network, devices won't be able to communicate at all. So as security improves, usability decreases.

The guest isolation may also be insufficient. The shared passphrase implies MITM capabilities, and passive traffic decryption capabilities with WPA2 or active decryption capabilities with WPA3.

Some routers place both ESSIDs on the SAME LAN. Usually this allows the secure devices to reach the guest devices. Usability has been increased, but this often leads to subtle flaws that allow the guest devices to bypass their isolation entirely.

Another upside to this approach is that bandwidth can be shared for the ESSIDs, reducing wasted WiFi spectrum.

Overall, this is an accepted best practice, but it comes down to the details where very quickly users are trading off security for usability.

The Best of the Three: Guest Router First, Secure Router Second

Option #2 is the recommended and accepted best practice. The Guest router connects directly to the internet, and the Secure router plugs into the Guest Router.

This approach yields a favorable combination of security and usability. Devices on the secure LAN can access devices on the Guest LAN, which is great for controlling IOT devices. And devices on the Guest LAN have no way to initiate communication to devices on the Secure LAN, blocked by the Secure Router firewall.

The main downsides: The guest router could have ISP credentials, and could MITM internet traffic if compromised by an untrusted device.

Multi PSK & VLANs

Today's most featureful home routers offer support for one passphrase per device. This solves many of the MITM and decryption issues for guest isolation. The devices can be placed into VLANs with unique WiFi passphrases, GTKs, and secure firewall rules creating truly strong isolation. These mechanisms provide powerful mechanisms for designing a home network securely.

This is the approach SPR follows, and we've spearheaded Multi-PSK with WPA3. SPR provides maximum isolation capabilities by placing each station into its own LAN. Users can then easily create groups of interconnected devices.

SPR Supports Plugging into An Existing Router Securely

We recommend running SPR by plugging it into an existing router. To support securely doing this, by default -- the firewall will block access to private network addresses over the upstream interface.

This prevents devices connected to SPR from accessing devices on the LAN of the current router.

To allow a device access to private network addresses upstream, users can apply the lan_upstream tag to the device.

And then manage the tag in the Devices view

· 2 min read

SPR's WPA3 Multiple Passwords per SSID Surprises People

WiFi nerds and people working on WiFi products have shared their surprise with me a few times now about the integration for multi-PSK with WPA3. This is something already mostly built into HostAP so it should be possible anywhere, although it is not obvious from the documentation. I'm told that most other projects simply don't do it, putting SPR at the head of the pack! In this post I'll share how it's integrated, so that others can benefit from the ideas and improve WiFi security for people all around the world.

WPA3 Authentication is Fundamentally Different

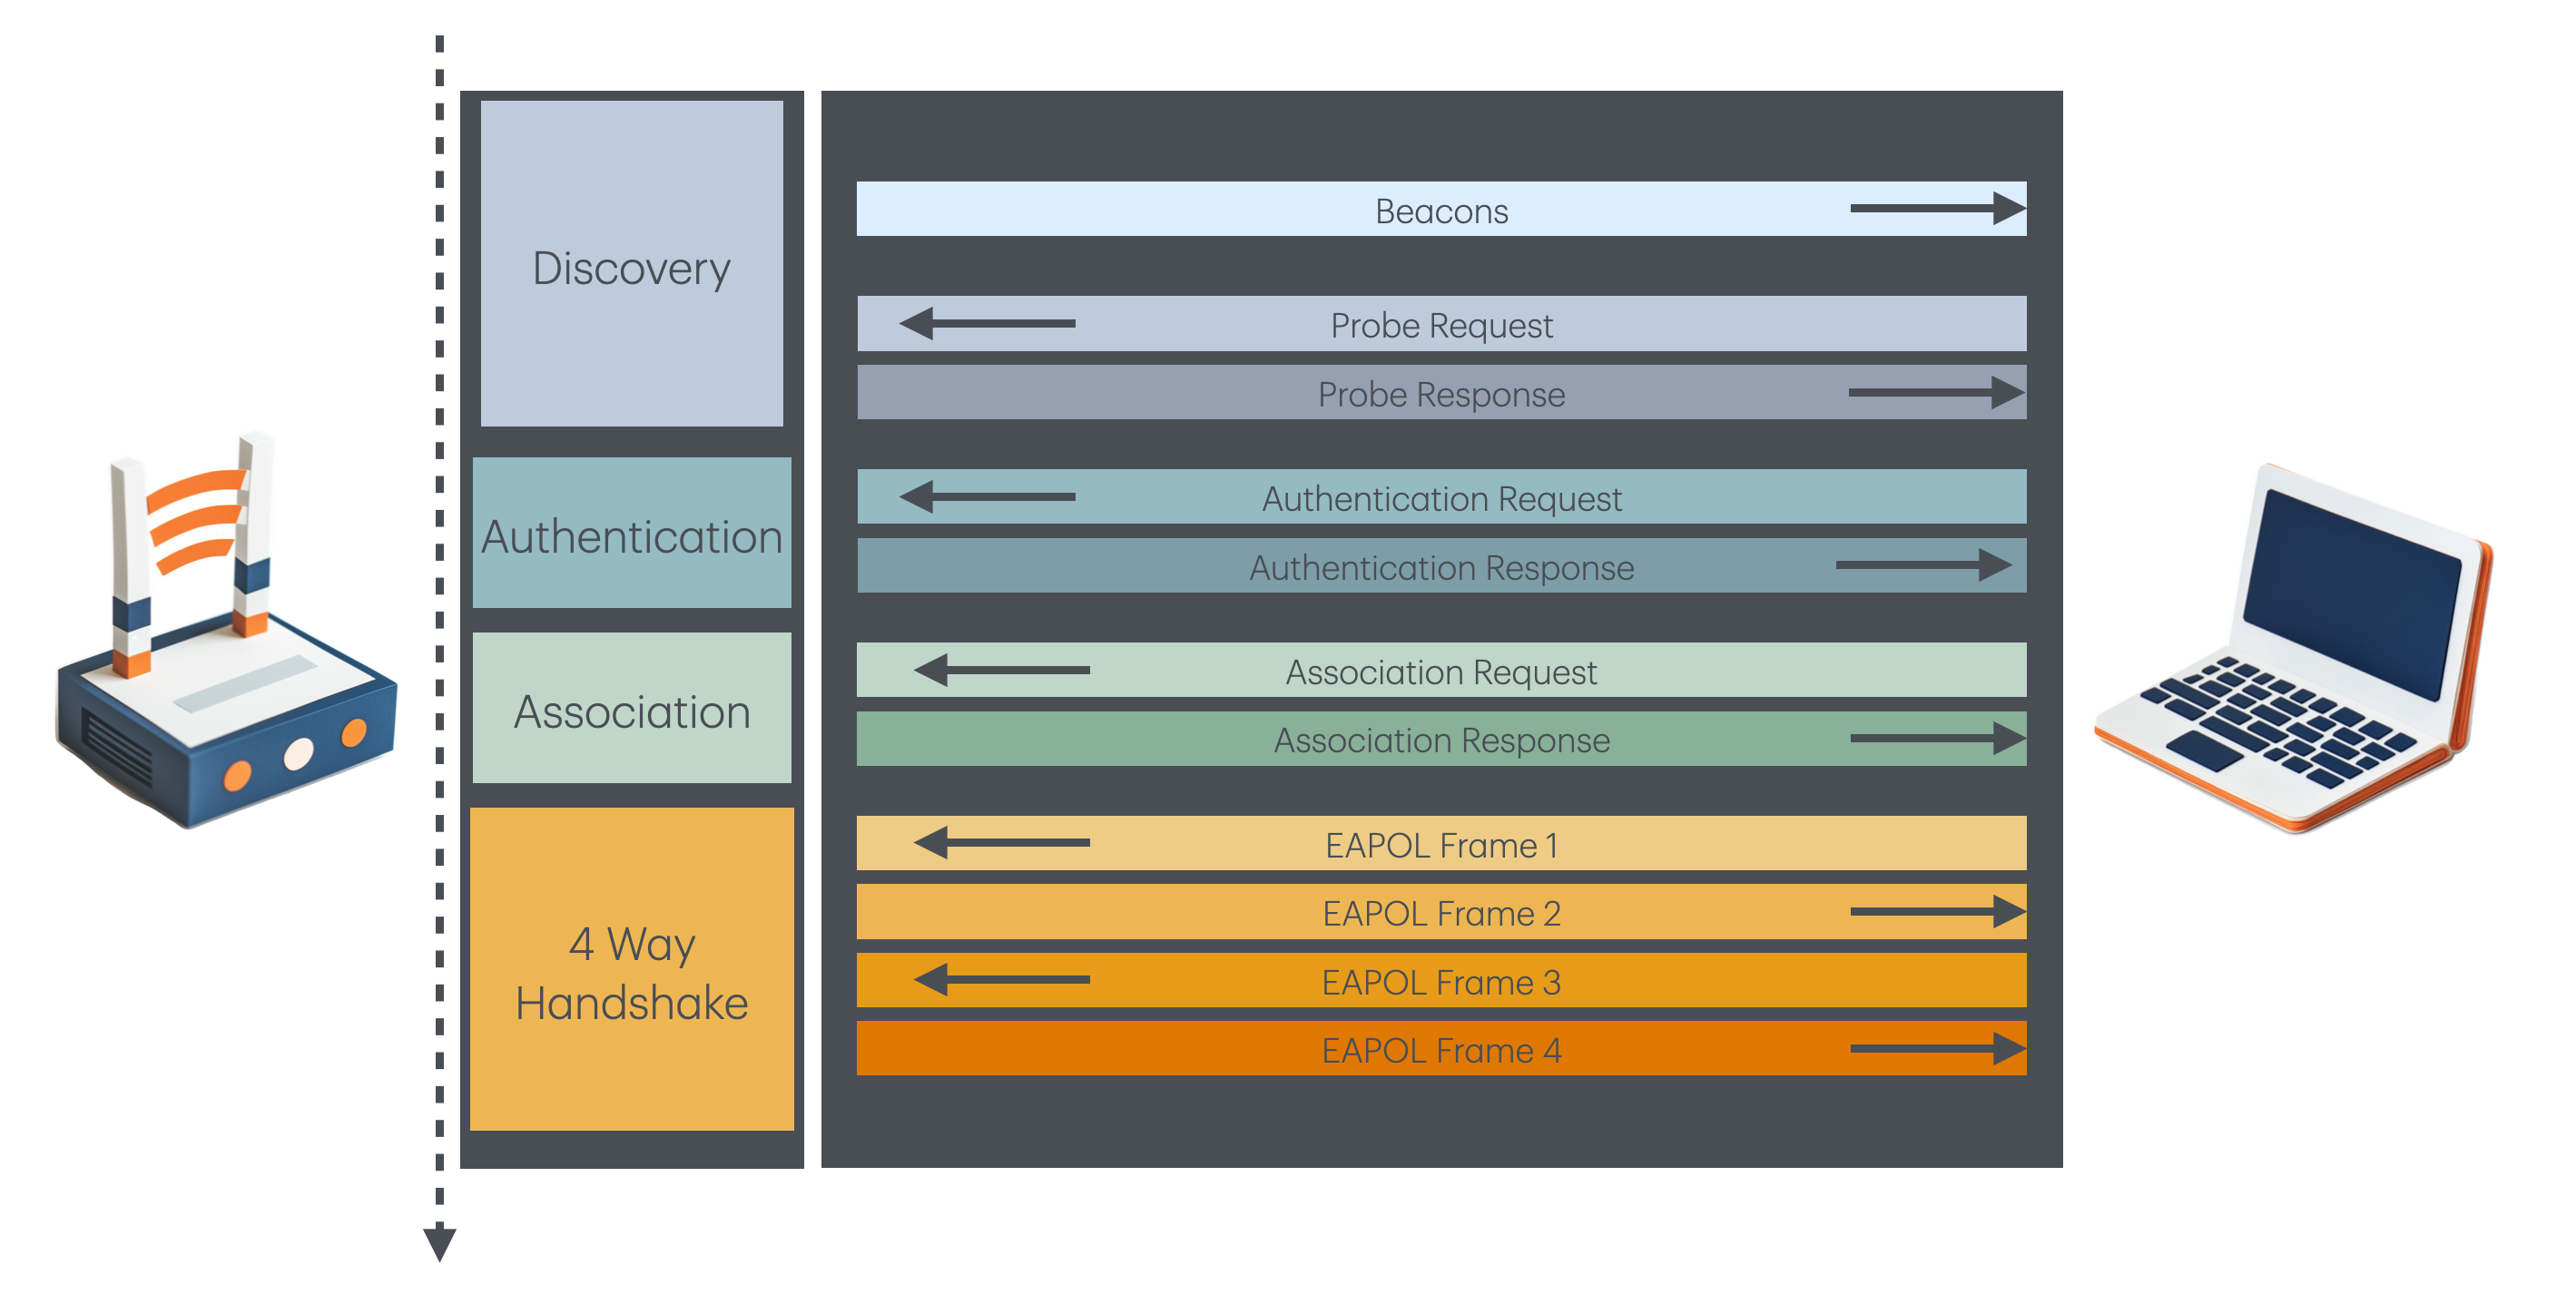
WPA3 authentication uses Dragonfly, a Zero-Knowledge Proof in its Simulataneous Authentication of Equals Handshake protocol. With SAE there is nothing to sniff and crack offline from the key exchange. This is in contrast to WPA/WPA2 which is notorious for password cracking of weak passwords from captured handshakes -- or even more conteniently, by using the RSN IE specification flaw.

For Multi-PSK, a router can go down the list of stored PSKs and try each key and see if it had a matching one. For WPA3, this is not possible. Authenticating a password requires an interactive zero knowledge proof, so a new handshake is required to try a different password.

SPR Uses HostAP's MAC Assignment

PSKs are assigned by MAC address. HostAP finds the passphrase to use by MAC address to perform the authentication, using the correct PSK the first time around for the interactive proof.

The syntax for hostapd.conf to assign multiple devices is as follows:

sae_password=1stPassphraseHere|mac=01:23:45:67:89:aa
sae_password=2ndPassphraseHere|mac=01:23:45:67:89:ab

Adding Device is Seamless

Adding devices is an easy process. If a user does know a MAC address, they can certainly specify the MAC address ahead of time. However, SPR can use a wildcard MAC to match a new incoming device. When the device authenticates, that PSK will be assigned to the device.

sae_password=3rdPassphraseHere|mac=ff:ff:ff:ff:ff:ff

Devices Workflow

First, go to the add device modal and add a device name and hit next

Next, scan the QR code or type the passphrase on a new device

Upon connection the UI will notify success and the PSK will be assigned to the MAC

· 3 min read

Intro

In this post we'll cover how to configure hostapd with the mt7915 to run 160 MHz channels over 5ghz. This allows stations to break gigabit speeds for WiFi with only 2 spatial streams.

Requirements

Preparation

  • Set up your AP device according to the SPR Setup Guide
  • For mt7915, run a mainline kernel or a kernel with fixes from https://github.com/openwrt/mt76 and the latest firmware. I'll publish some updates to building SPR with these in the near future. Fixes are needed for DFS support.

Hostapd configuration

  1. Modify config/wifi/hostpad.conf
  2. Make sure vht_capab includes [VHT160] and [SHORT-GI-160]
  3. Make sure to set vht_oper_chwidth/he_oper_chwidth set to 2.
  4. For the channel configuration, the following are valid 160mhz centers on 5ghz: [50, 114, 163]. Set the vht/he_oper_centr_freq_seg0_idx to these values and the channel to the center value - 14.
  5. Set ieee80211ax to 1
ctrl_interface=/state/wifi/control
country_code=US
interface=wlan0
ssid=TestLab
hw_mode=a
ieee80211d=1
ieee80211h=1
ieee80211n=1
ieee80211ac=1
ieee80211ax=1
he_su_beamformer=1
he_su_beamformee=1
he_mu_beamformer=1
wmm_enabled=1
preamble=1
ht_capab=[LDPC][HT40+][HT40-][GF][SHORT-GI-20][SHORT-GI-40]
vht_capab=[MAX-MPDU-7991][SU-BEAMFORMEE][SU-BEAMFORMER][VHT160][RXLDPC][SHORT-GI-160][SHORT-GI-80][MAX-A-MPDU-LEN-EXP3][RX-ANTENNA-PATTERN][TX-ANTENNA-PATTERN][TX-STBC-2BY1][RX-STBC-1][MU-BEAMFORMER[[MU-BEAMFORMEE]
vht_oper_chwidth=2
he_oper_chwidth=2
channel=36
vht_oper_centr_freq_seg0_idx=50
he_oper_centr_freq_seg0_idx=50
auth_algs=1
wpa=2
wpa_key_mgmt=WPA-PSK WPA-PSK-SHA256 SAE
rsn_pairwise=CCMP

# Security parameters

# Isolate stations and per-station group keys
ap_isolate=1
multicast_to_unicast=1

# Mitigate krack attack
wpa_disable_eapol_key_retries=1

# VLAN
per_sta_vif=1

# Passwords

sae_psk_file=/configs/wifi/sae_passwords
wpa_psk_file=/configs/wifi/wpa2pskfile
  1. Restart hostapd
root@pirouter:~/super# docker-compose restart wifid

If anything has gone wrong, check the docker compose logs for the wifid service.

Perf Test

Running iperf3 on the SPR device, and iperf3 on a client with AX210 chip, we see the following:

On SPR:

iw wls6 info

Interface wls6
ifindex 5
wdev 0x1
addr 00:0a:52:07:32:c9
ssid testlab
type AP
wiphy 0
channel 100 (5500 MHz), width: 160 MHz, center1: 5570 MHz
txpower 23.00 dBm
multicast TXQ:
qsz-byt qsz-pkt flows drops marks overlmt hashcol tx-bytes tx-packets
0 0 246 0 0 0 0 27114 272

iperf3 -s

On the station:

iperf3 -c 192.168.2.1

Performance results

Accepted connection from 192.168.2.26, port 56156
[ 5] local 192.168.2.1 port 5201 connected to 192.168.2.26 port 56158
[ ID] Interval Transfer Bitrate
[ 5] 0.00-1.00 sec 139 MBytes 1.17 Gbits/sec
[ 5] 1.00-2.00 sec 126 MBytes 1.06 Gbits/sec
[ 5] 2.00-3.00 sec 141 MBytes 1.18 Gbits/sec
[ 5] 3.00-4.00 sec 137 MBytes 1.15 Gbits/sec
[ 5] 4.00-5.00 sec 152 MBytes 1.27 Gbits/sec
[ 5] 5.00-6.00 sec 153 MBytes 1.28 Gbits/sec
[ 5] 6.00-7.00 sec 155 MBytes 1.30 Gbits/sec
[ 5] 7.00-8.00 sec 148 MBytes 1.24 Gbits/sec
[ 5] 8.00-9.00 sec 145 MBytes 1.21 Gbits/sec
[ 5] 9.00-10.00 sec 119 MBytes 995 Mbits/sec
[ 5] 10.00-10.00 sec 482 KBytes 1.22 Gbits/sec

· 3 min read

Intro

In the blog post we'll describe how to build and run SPR on a Mini-PC. And we'll use a WiFi 6 capable radio inside.

First, get a Mini PC ready

  1. Identify a good mini PC to use. Wilson suggested a look at QOTOM's i3 broadwell routers.

The g330 is not bad. It's a fanless build with a TDP of 15W. One mini pci-e slot is dedicated to mSATA, and the other can be used to fit a wifi radio. It also has additional SATA available for one more storage drive.

WARNING: On this device, the mini-pcie slot has a tall post for half-sized cards that needs to be removed to fit thicker full sized WiFi cards.

  1. Get a good WiFi radio.

We'll run with an 802.11ax card that works with Linux in AP mode (at least 802.11ac is recommended).

Mediatek is the disruptor in this space and supports AP mode on Linux. [NOTE: Many other cards will NOT work with ax in AP mode on Linux with open source drivers] . If you have recommendations please do not hesitate to reach out on the matrix chat. For the G330 Qotom, 2 antennas wires are provided to outside the case, so the 2x2 configuration is best.

The MT7915 can be purchased from AsiaRF.

Setup

Download and install Ubuntu Server. Since the WiFi 6 driver is a work in progress, we grabbed a daily release of Jammy Jellyfish 22.04 from the Ubuntu Live page to get the latest fixes. Copy the installer to installation media (a flash drive) then plug it in and go.

Then follow the SPR Setup Guide.

Our config/base/config.sh:

#!/bin/sh                                                                                                              
SSID_NAME=6lab
SSID_INTERFACE=wlan1

#PPPIF=eth0
#WANIF=ppp0
#PPP_VLANID=201
#PPP_PROVIDER=provider-config
WANIF=enp1s0
RUN_WAN_DHCP=true
RUN_WAN_DHCP_IPV=4
# Uncomment the next line if a second ethernet port goes to wired LAN
#LANIF=eth1
VLANIF=wlan1
VLANSIF=$VLANIF.

LANIP=192.168.3.1
DNSIP=$LANIP
TINYNETSTART=192.168.3.4
TINYNETSTOP=192.168.3.255
TINYNETMASK=255.255.255.252
TINYSLASHMASK=30
DOCKERNET=172.17.0.0/16
DOCKERIF=docker0

WIREGUARD_PORT=51280
#WIREGUARD_NETWORK=192.168.3.1/24

Configure hostapd for 802.11AX

On the SPR device, modify configs/wifi/hostapd.conf and add:

ieee80211ax=1
he_su_beamformer=1
he_su_beamformee=1
he_mu_beamformer=1
he_oper_chwidth=1 # 80mhz channel
he_oper_centr_freq_seg0_idx=42

Restart wifid

docker-compose restart wifid

Connect a wifi 6 client and verify HE codings are available

# iw dev wlan1.4096 station dump -v  | grep bitrate
tx bitrate: 1200.9 MBit/s 80MHz HE-MCS 11 HE-NSS 2 HE-GI 0 HE-DCM 0
rx bitrate: 720.6 MBit/s 80MHz HE-MCS 7 HE-NSS 2 HE-GI 0 HE-DCM 0

Some Notes on the MT7915

The MT7915 is a Dual Mode driver. This means that it supports both 2Ghz and 5Ghz frequencies simultaneously. For our install the 2ghz interface is on wlan0 and 5Ghz on wlan1. This is really wonderful, since one card can serve older IOT devices that only run on 2Ghz as well as more modern devices at high speeds.

The linux kernel driver is not yet as stable as it could be, so beware that it may not yet be production ready -- several assertions and crashes were noticed. The mainline kernel does not yet support radar scanning, however the code is available in the openwrt development branch.

· 3 min read

User Friendliness

The SPR project started out as a series of bash scripts and configuration files. Adding new devices was a little bit error prone, as everything was done on the command line. Each device would require a new, strong password, and each device needed to be added to a zone's configuration. Next, hostapd had to be restarted to get WPA3 password reloading to work. It was hard to debug and not apparent if things failed.

What would make SPR super useful, though, would be if it was easy to use. And a user interface can do that for us.

So this week, Supernetworks pushed out a frontend for testing.

This Release Delivers Basic UI Features

Three functions are now available:

  • Add a new wireless device to the network
  • List devices
  • Set device access zones

While these are simple things, and seemingly easy, SPR's services work together to build a network that is virtually unlike all other wifi setups available today. As a result, the base station service, the DHCP server, and the API need to work together to leverage their features so that users have a super smooth experience.

See a Demo

How Devices are Connected to SPR

  • Each wireless device is on an isolated network, keyed in by their MAC address and passphrase
  • MAC/ARP spoofing is blocked by hardened firewall rules to completely stop ethernet/IP-based evasion for lateral movement
  • Zones specify the level of each individual device's access
  • Custom zones can create groups of devices that can intercommunicate without having full LAN access
  • Built in ad blocking with CoreDNS

Some of the challenges were

  • Laying down a solid foundation between the API and frontend to make adding new features great
  • Supporting a smooth WPA3 experience, which uses a ZKP for authentication
  • Making it fast and easy to add a device without having to also know or enter its MAC address ahead of time

The Zones

The built in zones are

  • DNS for outbound DNS queries
  • WAN for outbound internet access
  • LAN for general access to all local devices

When a user types in a new name, such as "Cameras", NFTables verdict maps gets created by the API. All of the members of the maps can send and receive IP traffic to one another, but do not get general access to the LAN. In the future, custom firewall rules will be added to further specify how the groups interact.

What's Next for the UI

For the road map, I'm thinking about security features such as intrusion detection or automated security scanning and fingerprinting, network debugging and bandwidth monitoring, per-device ad blocking, and home automation.

· 6 min read

Hello, SPR

I'm happy to start releasing the Secure Programmable Router project to the world. I've been running my home WiFi with it for the past few months and I'm beyond excited to give back to the open source community. I started working on this project because I think that Linux provides a tremendous amount of agility and power for secure home networking but I felt like there was no router project out there that pulled it all together.

The SPR project is about several things

  • A highly secure foundation to operate a home network where using the internet is safe and it's easy to see and control what IoT devices are up to when they are plugged in.

  • Making home privacy easy instead of begrudgingly sharing telemetry with big data companies.

  • Open source and empowering developers by lowering the barrier to entry for coding with home networking.

  • About reducing the barrier for entry.

  • Enabling scripting and rapid prototyping.

  • Adapting modern networking paradigms and tools that can meets today's needs.

How SPR Came To Be

During the past year, I took a serious look at opnsense and OpenWRT, and ordered over a dozen different wifi routers to set up my home network. I sat down and built and deployed my own OpenWRT images and to set up secure wifi networks to connect with a more serious firewall. What I found was that the setups I had managed to achieve were not only frustrating to manage, but when I went to test their security, I found time and time again that vendor wifi routers were insecure due to fundamental limitations with the network designs. On top of that, they were riddled with software security holes. Unfortunately, running the open source builds of OpenWRT often had degraded performance versus the proprietary vendor patches or required breaking secure boot.

I felt frustrated because I felt like I had lost control over my own home network. I had only a basic idea of what I was running and what my devices were doing, let alone the routers themselves. Between smart bulbs and vacuum cleaners and home security cameras and speakers, TVs, gaming consoles, laptops, desktops, streaming devices, more routers, and work equipment, there was a lot of stuff that was online.

I've been working in computer security for over 15 years and I often get asked for how to set up a home network.

The best advice I could give people for their home wifi was to keep their mission critical systems on a dedicated wifi router, and plug that one into the main wifi router with all the other "stuffs" that ultimately connects to the internet. This is awkward and requires switching networks or IGMP proxying to do discovery or zeroconf. This doesn't scale well across a multi-office home with repeaters and backhaul. It also doesn't scale well in an apartment where there's competition for radio bandwidth with neighbors for essentially one of only three coveted 80mhz channels on 5ghz.

The next best advice was to split out the "whatever" non-critical devices to the guest network, and the mission critical stuff on the main network. Hardening the guest network with isolation breaks discovery and streaming as well. In practice I found that most of the routers I looked at did not have good guest isolation anyway when enabled, something I will blog about later. No exploits are required, because more or less an attacker can just ask a router to send packets for them to work around hostapd's AP Isolation feature, and most of the routers will happily do what they do best, route the packets.

At the end of the day though, it's fundamentally a flawed idea to have a shared passphrase across many devices because that passphrase effectively lets devices spoof each other or attempt to intercept traffic, making it tough to truly firewall devices.

So then I started looking into enterprise wifi authentication: 802.1x (EAP-PEAP, EAP-TLS, EAP-PWD). EAP-TLS really is the only secure way to do things since EAP-PEAP suffers from fundamental man in the middle issues that were never fixed. Or EAP-PWD (which is almost wpa3) would be great, if it was supported by more devices and drivers, and well with EAP-TLS, certificate management is pain.

I really wished that one could just use a unique passphrase per device. Well, it turns out that yes, that works, and hostapd supports it out of the box. With some logic and usability and correctness fixes to hostapd, and it was easy to seamlessly add new devices and their passphrases on the fly.

Okay that was great. Next, I created strong device isolation with per-device subnets that could be configured to communicate with other subnets using forwarding rules. The resulting network was a bit too different than the spirit of the networking scripts in OpenWRT, and the patching became unreasonable to expect for upstream to accept, so I started from fresh ground.

SPR is implemented for rapid iteration. Services are containerized so that developers can swap out core services or roll up new ones in a testable, reproducible manner. An API drives configuration to allow for customization. SPR Runs off of Ubuntu, with Docker containers, and manages the network with NFTables. It uses hostapd for the base station software, CoreDHCP for DHCP, CoreDNS for DNS, and supports Wireguard.

SPR simply enables users to do better than today's status quo. It lets users run a hardened, secure network without restrictive drawbacks. It lets users connect their consumer electronics to the internet with the peace of mind that doing so does not weaken their home network security.

What's Next

Today SPR runs as a proof of concept on a Raspberry Pi. With a USB dongle it's well able to handle over a dozen wifi stations and serve data from the internet with rates up to 500mbps. Work is underway to expand to new systems.

I'm currently wrapping up a Web UI to make SPR user friendly. In the near future I'll be posting a road map for what's planned.

Want to learn more and discuss? Join the Discord Chat